Yarrow: Herb of the Year 2024 

Janice Cox 

A closeup of the white flowers of Achillea millefoliumYarrow is a popular perennial herb that can be found in many gardens, mine included. It is known as a powerful “healing” herb. It’s also a fantastic landscape plant, culinary ingredient, and can be a key ingredient in anti-aging and healing body care products. 

I have my yarrow planted along my driveway. I call it my “protector” plant as it keeps deer and rabbits out of my yard. They do not like the scent or bitter tasting leaves. It also helps as a ground cover, keeping weeds out and my yard in bloom. Yarrow comes in a wide range of colors from creamy white to dark red. It will also attract birds and pollinators to your yard, helping all of your plants bloom and produce more. 

Yarrow has antibiotic and anti-inflammatory properties. It is cooling, soothing, and healing when used in skin care products. A simple tea or infusion of fresh flowers and leaves makes a calming product for troubled skin, insect bites, or a bad sunburn. Simply apply to your skin using a spray bottle or cotton pad. Yarrow in the bath is especially refreshing and will also boost your circulation. The most popular use of yarrow is as a key ingredient in healing skin balms and lotions. Yarrow leaves are powerful and have been used to stop bleeding in cuts and scrapes and also help the healing process. Legend has it that Achilles, the great warrior, used yarrow leaves to heal his soldiers’ wounds after battle. This may also be the reason the plant genus is called “Achillea.” 

Sepia toned illustration on black background of Achilles tending the wounds of PatroclusYarrow can also be used in the kitchen when making bitters, teas, salads, and salts. You can use just about everything from oils, butters, honey, and vinegar in which to infuse the bitter peppery leaves, and adding a bit of citrus or sugar will help enhance yarrow’s strong flavor. You only need a few leaves, as the taste can be overpowering in dishes. Also, when infusing in oils always use dried yarrow so you do not introduce any extra moisture, which can spoil your product. 

Yarrow is an especially beautiful dried flower and dries very quickly and easily. Pick bunches not larger than a quarter in diameter and let them air dry in vases or hanging from drying racks. If you are seed saving you may want to dry your bunches in paper sacks to help with collection and to protect them from dust or bugs. 

Here are a few recipes for you to try at home: 

Pink and white inflorescences of Achillea 'Colorado Mix'Yarrow Cucumber Cleanser 
Cucumber is naturally cleansing and calming to your skin. When you combine it with fresh yarrow flowers you have a mild cleanser that can be used in place of soap for all skin types.  

1 whole cucumber 
1 Tablespoon fresh yarrow flowers and leaves or 1/2 Tablespoon dried 
1/2 cup water 
1 teaspoon honey 

Yield: 4 ounces 

In a blender or food processor combine all ingredients and process on high until you have a well-blended mixture. To use: Massage into your skin and let sit for a few seconds up to a minute. Then rinse with warm water followed by a cool water rinse and pat your skin dry. Store any leftover cleanser in the refrigerator. 

Yarrow Bath Salts 
Yarrow makes a relaxing bath. Fill a muslin tea bag with fresh flower heads and some leaves and toss in your tub as it fills, or wrap inside a cotton wash cloth and use as a “scrub” sack in the shower. Combined with popular bath minerals it makes for a soothing soak that will also boost your circulation. 

1 Tablespoon fresh yarrow leaves and flowers 
1/2 cup Epsom salts 
1/2 cup baking soda 
1/4 cup sea salt 

Yield: 10 ounces 

Mix together all ingredients and spoon into a cotton sack or onto a cotton wash cloth and secure with a rubber band. To use: Toss in a warm tub. Soak for 20 minutes. 

Achillea Terracotta 2 by Chrissy MooreYarrow Flower Salt 
Making herbal salt is a simple process with benefits. Yarrow supports digestion and also helps reduce bloating. You can create a simple salt that can be used in cooking. Just use care as a little bit will go a long way. Yarrow adds a sweet, bitter flavor to the salt. 

1 Tablespoon sea salt 
1/2 Tablespoon fresh yarrow flowers 

Grind together the yarrow and salt until fine and spread on a clean tray or cookie sheet to dry.  You may also use dried yarrow and skip the drying step. To use: Use as a finishing salt on your dishes. 

Medicinal Disclaimer: It is the policy of The Herb Society of America, Inc. not to advise or recommend herbs for medicinal or health use. This information is intended for educational purposes only and should not be considered as a recommendation or an endorsement of any particular medical or health treatment. Please consult a health care provider before pursuing any herbal treatments.

Photo Credits: 1) Achillea millefolium flowers (Erin Holden); 2) Achilles tends the wounds of Patroclus (Bibi Saint-Pol); 3) Achillea ‘Colorado Mix’ (Erin Holden); 4) Achillea ‘Terracotta’ (Chrissy Moore)


Janice Cox is a garden writer and natural beauty expert. She is the author of Beautiful Flowers, Beautiful Lavender, Beautiful Luffa, Natural Beauty at Home, Natural Beauty from the Garden, Natural Beauty for All Seasons and the newly released Natural Beauty at Home Handbook.  She was the beauty editor for Herb Quarterly Magazine for more than twenty years.  She is the education chair for The Herb Society of America and a member of the International Herb Association. She makes her home in southern Oregon. 

Treat Yourself to a Midwinter Spa Day: A Homemade Herbal Valentine’s Gift to Yourself!

By Beth Schreibman Gehring

_DSC1257It’s midwinter, and many of us are stuck inside due to cold weather. To beat the winter blues and celebrate St. Valentine’s Day, why not treat yourself to a homemade herbal spa day? A day spent like this is a perfect opportunity to connect with yourself and bring the beauty of nature inside.

Herbal spa days are an easy and romantic way to soften your dry, parched winter skin using ingredients such as rose petals, essential oils, jasmine, and coconut oil. They can help you create lotions, potions, and body butters that are not only good for your skin, but also have a relaxing and rejuvenating effect on your body, mind, and soul.

bowls of herbs and flowersTo begin, gather all the ingredients you will need for your homemade herbal spa day. I’m including some of my favorite recipes here, or you can find recipes for body butters, lotions, and potions online, and use them to create your own unique blends. Some popular essential oils for skin care include lavender, rose, geranium, and jasmine. You can also add dried flowers, such as rose petals or jasmine blossoms, to your blends for an extra special touch.

I always tell my clients that if you can eat it…you can generally put it on your body. For the most part, this is very safe advice, but always be on the alert for any kind of allergic response to any ingredient you choose.

Here are some of my favorite ingredients for home-crafted body care lotions and potions: 

I love to use raw honey, because it’s naturally antibacterial, full of antioxidants, moisturizing, and very soothing. So, it’s great for calming broken out and parched skin, giving your complexion a needed lift. Its inclusion in any recipe really helps create a glow. Combined with ingredients like ghee, avocado, and green clay, raw honey makes a wonderful face and hair masque.   

Dried rose budsI am never without sterile French green clay, because it’s a wonderful base for any face or body masque; it’s like a mini mud bath you can use at home! I’ll often mix green clay with olive oil and a gentle essential oil, like rose oil, to make a simple face masque that I pat on, leave for 15 minutes, and then wash off.

Himalayan salt is another great ingredient for nourishing my skin–it’s like Epsom salts, only better, when used in a bath. The salt eases everyday aches and pains, and it’s also my favorite salt to use in homemade salt scrubs.

Ghee–or clarified butter–is a terrific moisturizer for skin and hair. In my observation, ghee seems to bring a soft glow to the skin that most other oils don’t. It also doesn’t smell odd when you use it the way that regular butter would, making it a wonderful base ingredient for infusing essential oils and fragrant petals for skin softening treats.

Bowl of body butter and a candleTo make my favorite body butter, take one cup of ghee and scoop it into a small bowl. Add six drops of rose essential oil, six drops of jasmine essential oil, and three drops of holy basil essential oil. Beat this together with a fork until incorporated. Use as you would any body butter. I particularly love this blend, because it is so very good for your vitality, mood, AND your skin.

If you are lucky enough to have a blooming jasmine plant, pick the fragrant blossoms and mix them gently into the butter, then place the container in a warm (not hot) place. After a few days, pick them out. You will have what is known as jasmine enfleurage. Enfleurage is the perfumer’s art of creating scent by having fragrant flowers release their oils into fat.

Full of fatty acids, coconut oil is another one of my favorite moisturizers for skin and hair. It can be used to remove makeup, but I think it’s at its best when mixed with some coarse brown sugar and a couple drops of your favorite essential oil to make a luscious sugar scrub. All by itself, coconut oil makes a wonderful massage oil, but when blended with a bit of vanilla essential oil, it becomes a heavenly treat.

Cup of tea with a journal and flowersSo, to begin this blissful day, find a quiet corner in your home where you can create a peaceful and calming atmosphere. Buy yourself some beautiful fresh flowers beforehand. Light some candles, play some soothing music, and get ready to pamper yourself. Our goal for this day is pure connection. Bring nature inside. Begin by taking a few minutes to shut your eyes and meditate or take a few cleansing breaths. I like to keep a journal nearby to write down any thoughts that come up before I start. This is more for emptying and quieting the mind, so that I can fully enjoy the treats I’ve prepared!

Once you have gathered everything you are going to use, start by taking a warm bath or shower to open your pores and prepare your skin for all the pampering it’s about to receive. After your bath, apply your homemade lotions and potions to your skin, focusing on areas that are particularly dry. Take your time to massage the products into your skin, letting the ingredients work their magic.

To finish pampering yourself on Valentine’s Day–or any day–I don’t think there’s anything more glorious than a relaxing foot bath. In this recipe, I’ve used pine essential oil, a fragrance that I love for promoting emotional balance, as well as respiratory support, and rose geranium, an oil that I use to help reduce hot flashes in women of a certain age! To make this foot bath, I use hot water, about a cup of Himalayan salt, many of my favorite smooth rocks and crystals that I’ve brought back from the many rivers and seas I’ve visited, two cups of fresh kombucha of any flavor, which is glorious for gently exfoliating the skin, and fresh catnip and rose geranium leaves, whose scents can promote relaxation and joy.  I use three drops of each oil that I wish, but no more than two different oils, and I always add 1/4 teaspoon of olive oil to diffuse the essential oils.

Soak your feet for 15 minutes, drink a relaxing cup of tea, and then dry your feet. Finish by exfoliating with the sugar or salt scrub of your choice, rinse again, and smooth your feet with some of that glorious jasmine body butter. Then, put on a pair of warmed socks and enjoy.

Cup of tea with cinnamon sticks and flowersFinally, finish your spa day by wrapping yourself in a soft warm blanket and enjoy the peace and quiet. Take a few deep breaths, and let yourself relax completely and even drift off to sleep for a while. When you awaken, pay close attention, because often the first thoughts upon waking can be the catalysts for important life changes. When you are ready, enjoy another cup of tea or a glass of wine and savor the moment. Don’t forget a delicious piece of chocolate!

A homemade herbal spa day like this one is a wonderful way to celebrate Valentine’s Day and connect with yourself in a way that is normally difficult to do with our busy schedules. It’s a simple and inexpensive way to bring nature inside during this time of the year and help alleviate the midwinter doldrums.

Medicinal Disclaimer: It is the policy of The Herb Society of America, Inc. not to advise or recommend herbs for medicinal or health use. This information is intended for educational purposes only and should not be considered as a recommendation or an endorsement of any particular medical or health treatment. Please consult a health care provider before pursuing any herbal treatments.

Photo Credits: 1) Winter scene (C. Moore); 2) Dried herbs (Canva); 3) Dried rose buds (Victor Wong, Creative Commons); 4) Herbal body butter (Canva); 5) Tea and journal (Canva); 6) Tea (Canva).


Beth Schreibman Gehring is a lover of all things green, delicious, growing, beautiful, magical, and fragrant. She’s also a lifestyle blogger, storyteller, and occasional wedding and party planner who uses an ever-changing seasonal palette of love, life, and food to help her readers and clients fall madly in love with their lives! Beth lives and works with Jim, her husband of 40 years, and is owned by 17 full sets of vintage dishes, hundreds of books, two cats, one dog, a horse, a swarm of wild honeybees, a garden full of herbs, fruit, vegetables, and old rambling roses, too many bottles of vintage perfume and very soon, a flock of heirloom chickens! In 2014 she took a stab at writing a book called Stirring the Senses: How to Fall Madly in Love with Your Life and Make Everyday a Day for Candles & Wine. Available on Amazon! Join her in her gardens at https://bethschreibmangehring.substack.com/, or contact her at  beth.gehring@stirringthesenses.com

The Pleasure of Pomanders

By Pat Kenny

The name comes from the French, pomme d’ambre, pomme for apple, referring to the round shape of the early scent balls. Ambre is derived from ambergris, a substance washed up on beaches from the sperm whale which was the chief fixative for fragrances in Renaissance times.

One of the first reasons for making pomanders was the carrying of religious keepsakes (Fairamay, 2018). Adelma Simmons tells us, “originally pomanders were not made of oranges or apples but of small balls of various materials that would hold herbs, herbal scents, spices, and perfumes.  Sometimes beeswax was used for the medium. Other bases included garden soil, mold, or well-drained apple pulp.  The balls that were made only of gums and spices were costly and not available to the average household.”

There were many types of pomanders. Through the years, spices, essential oils, and green herbs including rue, sweet bay, lavender, and rosemary were used not only for their sweet scents but also for protection against contagious diseases. Historically, pomanders were either located somewhere in the home, worn around the neck, or attached to the belt like a bit of jewelry to safeguard against infection, disease, and bad luck.

Medicinal pomanders, some for curing fevers, some for insomnia, many for the medieval counterpart of what we call “nerves”, became popular.  They were a part of stillroom activities and a source of revenue for the professional apothecary.  Silversmiths and jewelers made exquisite cases for balls containing expensive perfumes, and these were worn as ornaments about the waist, while tiny ones were fashionably worn as lockets.  Sometimes beautiful metallic globes were fashioned to hold the scented material, and they were often pictured hand-held on chains in portraits of persons of high standing.

Pomanders were also carried by men in many professions.  Doctors, while visiting the sick, carried them.  Lawmakers and judges who argued and heard cases in closed courtrooms with prisoners “infected with jail fever” considered pomanders invaluable.  The dandy on the battlefield drew long breaths from a scented box to mitigate the stench of battle, and the traveler who walked along the streets lined with open sewers often carried his herbs and spices in the head of a cane which was opened and sniffed at will.

Courtiers traveling luxuriously in sedan chairs lifted languid hands to hold a pomander to the nose during passage through odorous crowds.  In pioneer New England the spice balls, clove apples, or clove oranges were placed in homemade coffins that were kept in many attics ready to receive the bodies of those who did not survive the long winters.  Often the graves could not be dug until spring, and farms were too isolated to call on the services of professional embalmers.  Pomander balls were then put to their ancient uses of preservation and fumigation, and known as “coffin balls”.

At the least, the pomander enabled its owner to escape the stenches of rotting garbage and open sewers in the airy pleasantness of garden herbs and exotic spices.  The delicate ladies and foppish gentlemen of the aristocracy would daintily wend their way through the bitter realities of the streets, sniffing their pomanders.

To turn to a happier use of pomanders, it was an English custom recorded in the time of Henry VIII to give one to each guest at New Year’s tied with a sprig of rosemary for remembrance.  This was not only a sign of esteem but of good luck.

However, today the pomander is merely an aromatic novelty, though many of the original uses stand the test of legitimacy.  Pomanders can be hung from ribbons in a room or closet, or tucked away into drawers and chests to keep moths away and give an aromatic scent.  They can be wrapped in a colorful cloth or fancy netting or just stacked in a bowl; their uses are varied and the pomander brings a welcome fragrance.  It’s an aromatic delight!

How to Make a Pomander

Pomanders are usually made with apples, crabapples, oranges, lemons, or limes.  Apples are the easiest because you can usually push the cloves into the apple’s skin with your thumb.  Lemons, limes, oranges, and grapefruit often have to have their skin broken with a bamboo or metal skewer in order to insert the clove.  Kumquats are little, their skin is thinner; they dry faster and are cute for miniature table trees.  They are not always available; watch out for them around the holidays, they last long in the refrigerator so buy them when you can.

I have rolled the completely-cloved fruit in mixes of ground orris and spices, yet some people are allergic to powdered orris root and the mix gets caked between the cloves. In my opinion, the mixes make the pomander hard to handle and just plain look awful.  One writer reminds us that frugal New England housewives who used pomanders would have found the cloves expensive enough without adding the orris and other ground spices recommended in more modern times.

All my most successful pomanders have been dried by simply hanging them in a warm, dry place, i.e. over the refrigerator warmth, next to a radiator or in the warmth of a pilot-lit gas oven for days or weeks, turning them if necessary.  

Materials

Paper towels

Bowls to help sort cloves, partial pieces saved

Tweezers or hemostats to help grasp cloves

Long-nosed pliers to twist the central hanger

Rubber-coated wire or other wires

Bamboo or metal skewers 

Long needles for threading

Large paper clips to use as s-hooks when drying, however you can dry the cloved fruit lying down (you may have to turn it over or around periodically).

Ribbons, bows, yarns, etc. With or without a central hanger, pomanders can be wrapped and hung in netting or stacked in a bowl. Spice oils of clove, cinnamon, etc. can be added.

Remember, I usually dry mine in an old-timey oven that has a pilot light or next to an old-timey radiator, turning it periodically. Cute, guess I have become old-timey myself; lucky me!

Procedure

  1. Choose a solid fruit.
  2. Skewer the central diameter of the fruit with care.
  3. Create a hanger through the center; includes deciding what you want to happen at the bottom of the pomander (empty loop, bead, bell?).
  4. You could sort your cloves at any time, deciding the size(s) and/or the ones with or without the dried bud and/or the thickness of the pedicel.
  5. Depending upon the type of fruit and the thickness of the skin, decide whether there is a need to make a hole with a skewer first before the insertion of the clove. Space cloves, remembering shrinkage makes them become closer.
  6. Cuddle the fruit, if necessary, with a folded paper towel which will absorb juices.
  7. After the fruit is cloved the way you want, put it where it will dry, checking it often and cuddling it within both palms if necessary to push the cloves in as it shrinks.
  8. If storing the pomanders long-term, give them a freeze treatment for about a week to kill off any pests or eggs. Make sure the pomander is dry and hard before doing so.

If you do desire to use a spice mix, here is a simple recipe:

1 tbsp. each: cinnamon and ground cloves with 1 tsp. ground orris root; place bowl in warm place and roll pomander in it twice or more a day for 3 days; remove it from bowl and set it in warm place for 2-3 weeks to dry out completely.  Decorate your pomanders with ribbons, flowers, herbs, beads or bells to hang on your holiday tree, in windows or in closets.

Photo Credits: 1) Orange and clove pomander (Wendy Piersall); 2) Silver pomanders of the 17th century (Wellcome Images); 3) Portrait of a woman by Bartholomaeus the Elder (public domain); 4) Portrait of a man by Christopher Amberger (public domain); 5) European pomander in the shape of a ship (public domain); 6) Apple and other fruit pomanders (Pat Kenny); 7) Banana pomander (Pat Kenny); 8) Pomander Pat (Sue Betz)

References

The previous writings of the following were consulted for this post:  Adelma Simmons, Mrs. Henry C. Martin,1968; Eleanor Sinclair Rhodes, 1969; Ann Tucker Fettner, 1977; Sarah Garland, 1979; Sylvia Lloyd & Arlene Linderman, Linda Foldan, 1984; Barbara Milo Ohrbach, 1986; Edythe Skinner, Hartman’s Herb Calendar, Dec. 1988; Barbara Radcliffe Rogers, Herbitage Farm, Richmond NH; Pat Kenny, 1989; David Merrill, 1991; Janet Walker, USNA Newsletter, 1996.

Fairamay, T. July 2, 2018. Thorn and thread: Warding off plague and other miasma with pomanders. Accessed 12/8/2021 from https://thornandthread.wordpress.com/2018/07/07/warding-off-plague-and-other-miasma-with-pomanders/#_edn13

Mabberley, D.J. 2008.  Mabberley’s plant book: A portable dictionary of plants, their classification and uses, 3rd ed. Cambridge University Press, New York.

Mabey, R. 1988. The new age herbalist: How to use herbs for healing, nutrition, body care, and relaxation – With a complete illustrated glossary of herbs and a guide to herb cultivation.  Macmillan, New York. 

Ordish, G. 1985.  The living garden: A 400 year history of an English garden. Houghton-Mifflin Co., Boston.


While working as a medical illustrator for over thirty years for a “modern medicine” research factory in Bethesda, Maryland, Pat Kenny simultaneously followed her heart/mind in the path of nature and practiced balancing herself with Tai Chi and herbal studies. She began to play with like-minded others through county community programs, The Herb Society of America, the Prince George’s Herb Society, the Michigan Herb Associates, and the North Carolina Herb Association. Now retired, she is cleaning house after all those years of not, using up things she has been saving for what?…an herb business of some sort? (in another life!), giving herb talks to share the herbal stuff, and seeking ways she can facilitate the cause of alternative health practices, especially botanical healing during the rest of her life.

HSA Webinar: Herbal Hues

by Sasha Duerr

Sasha Duerr is an artist, designer and educator who works with plant-based color and natural palettes. Join her this Thursday, August 26 at 3pm Eastern as she explores creating natural dyes. 
Our webinars are free to The Herb Society of America members and $5.00 for guests. Become a member today, and enjoy all of our webinars for free along with access to the webinar library with over fifty program titles. To register, visit  www.HerbSociety.org/hsa-learn/hsa-webinars/ 


IMG_7166For those who love color AND plants, natural dyes connect you instantly to a vast range of artisanal hues that are truly vital, vibrant, and inherently meaningful through the ingredients themselves.

Plant-based palettes tell stories that are inherent to places, people, and the plants, and plant-based colors can be conjured seasonally from weeds, yard waste, florals, and food. There is an intertwined overlap with natural colors that are awe-inspiring and a color story that can directly color map an experience, like a walk in the woods, a seasonal produce palette made from by-products of your local farmers market, hues from medicinal plants, or even weeds or green waste found in your own backyard or neighborhood.

Natural color palettes can create wonder in the form of an inspirational curated experience on a whole other level, since the colors come from a living source. Botanical color palettes are stunningly visual, while at the same time they connect us to our senses holistically – inspiring us toward the creativity, wonder and importance of plants and their unique ecologies. 

HerbalHues3
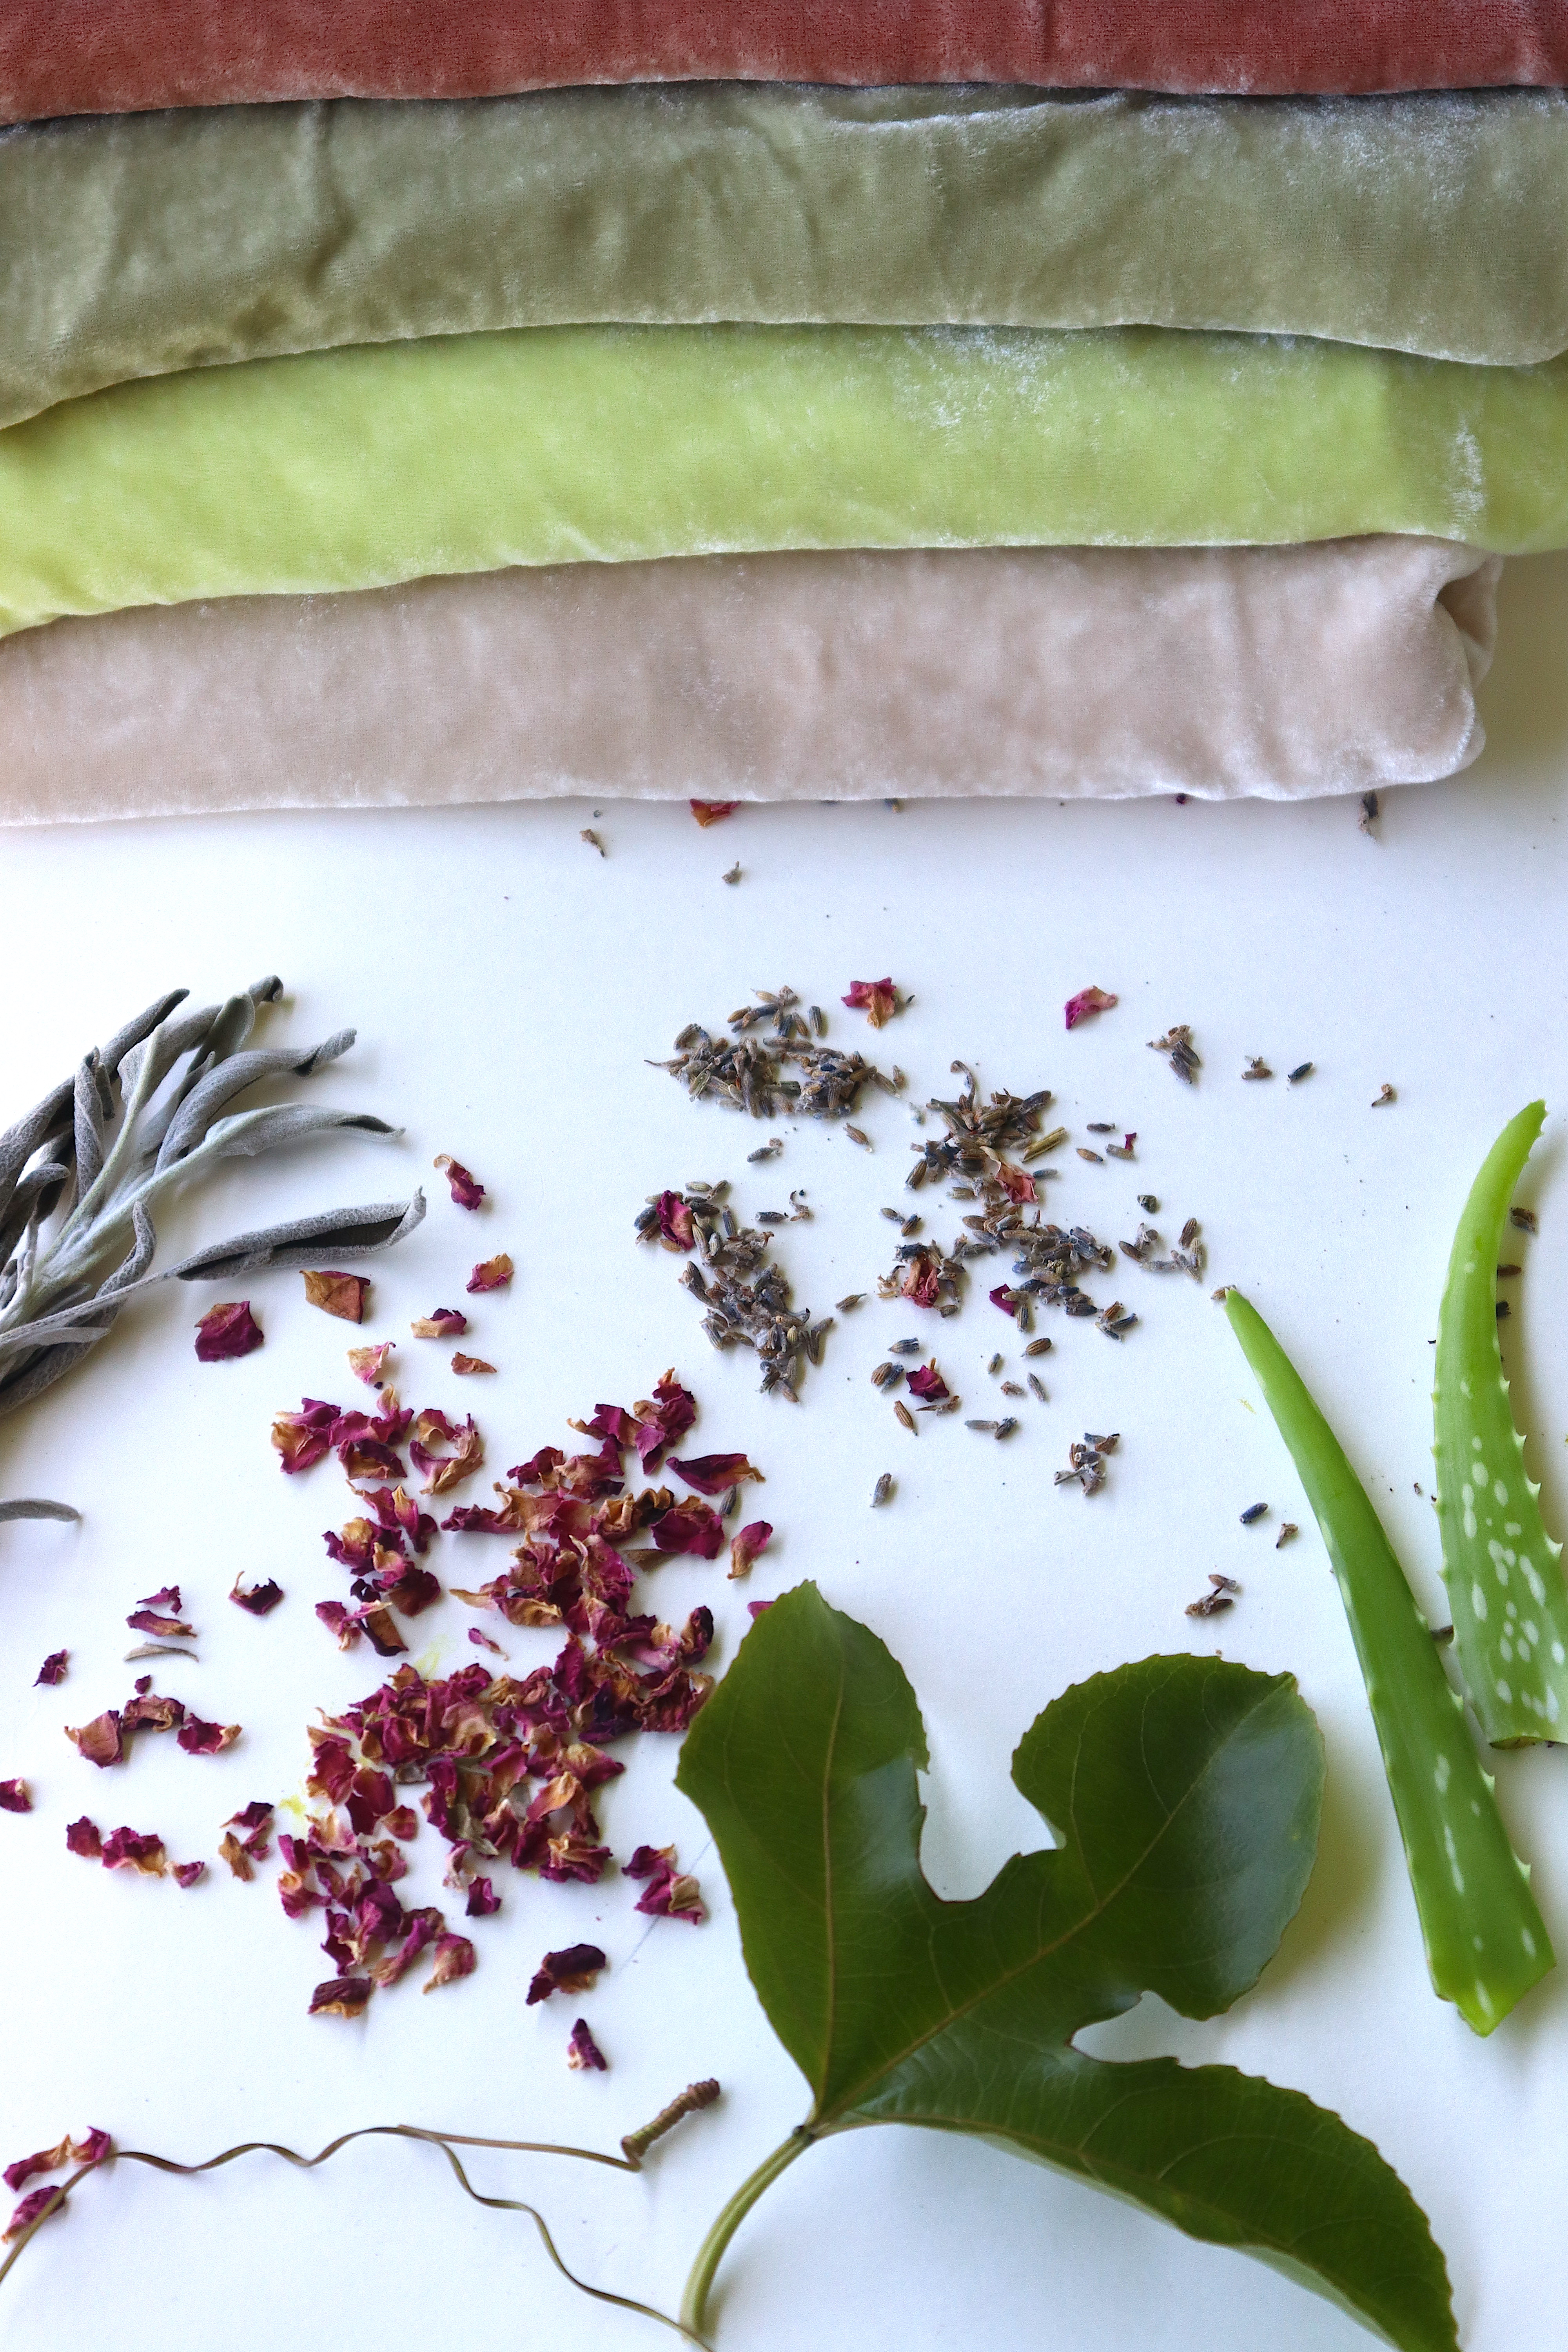
Lavender, mint, and passionflower leaves, which are sources of natural dyes, also have soothing therapeutic properties, easing sleep and anxiety by calming stressed nerves. These plants, as well as marigold, rosemary, sage, and aloe can also create a spectrum of aromatic hues from soothing yellows, to in-between blues, greens, and gray. True color therapy through and through. 

Creating a color story harvested directly from your herb garden can be as easy as brewing a tea. Herbs valued since ancient times engage us in a wide range of ways through the vitality of their aromatic, medicinal, and culinary uses, as well as the gorgeous colors they can create. 

Natural color palettes point toward the uniqueness of time and place and that is what makes the palette even more awe-inspiring than a synthetic one. The beauty and depth of working with plant-based palettes brings authenticity and immediate connection and story building built in with your color palettes because they come from slow and steady living sources.  

These colorful experiences speak of thousands of years of ethnobotany- a true and undeniable color coordination of nature and culture, which has, for the most part, remained dormant since the Industrial Revolution except by those dedicated communities and individuals who have kept the natural color spectrums brilliantly alive.

GATHERING

Aloe2Working with natural color can be a way to forage for beautiful natural hues and to connect with your local ecologies, even in your own backyard or urban sidewalk. When working with a landscape, consider what is abundant, in season, accessible, and even invasive. Wild fennel – seasonally abundant on the West Coast or in summer gardens – can be quite an aggressive plant in the landscape (even on urban sidewalks!) making it a wonderful and seasonal dye to gather. Collecting fennel flowers and fronds at their peak or just after provides the brightest hues. Wild fennel can create gorgeous fluorescent yellows from both the fronds and blooms. 

When gathering dye plants in the wild, make sure that you ethically forage, properly identify your plants, ask permission as needed, never take more than a plant or place can sustain (unless the goal is to harvest your full plant or to repurpose what may be considered invasive, waste or weeds), and always gather with awareness and gratitude. Knowing your sources, the plants, people, and ecologies you gather from is the best way to engage in regenerative and healthy practices with plant-made color. 

COLOR MEDICINE

Calming shades of yellow from calendula, soothing pinks from aloe leaves, steely blues from elderberry, and healing greens from yarrow, comfrey, and nettle – plant dyes can offer both healing remedies and beautiful color.  These therapeutic tones made from medicinal plants can also make gorgeous healthy hues at home. 

Aloe dye can be made from the roots of the plant for warm coral tones and from the leaves for pinks and yellow shades, depending on the pH of the soil and the water that creates the dye. Aloe as a dye holds two-fold the benefits of color medicine on cloth – its non-toxic beautiful hues and its ability to add nurturing elements. Unlike synthetic dyes, natural dyes by their very nature are nourishing, soothing, and replenishing to the wearer and the dyer. 

ALOE DYE RECIPE
Aloe spp.

Aloe
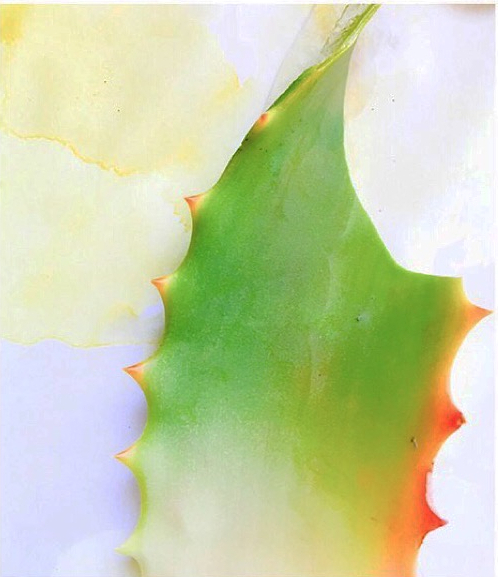
Aloe, a succulent whose soothing leaf gel helps to heal burns, keep the skin hydrated, and offer UV protection from the sun’s powerful rays, can also make calming color palettes. Aloe is used as a plant dye in many areas of South Africa, where the roots are most often used to dye wool red and brown. From the leaves you can also make luminous soft yellows and pinks—without the use of any additional mordant. 

No mordant (additional binder) is necessary to create soothing yellows. A source of alkalinity, like soda ash, added to the dye bath can also conjure soft pinks and coral hues.  This recipe works best on protein fibers like silk and wool. 

WHAT YOU’LL NEED

4 oz of dry weight clean wool or silk fiber

16 oz of chopped aloe leaves

To shift from yellow tones to pinks, use 4% weight of soda ash to dry fiber 

GETTING STARTED

-Soak your natural fibers in lukewarm water and a pH-neutral soap for at least 20 minutes. Overnight is best.Aloe dyed fabric

-Chop the aloe and place it in a stainless-steel pot (reserve a pot just for dyeing, not for eating) full of enough water to cover your fiber and to allow your materials to move freely.

-Set the heat to 180°F (82°C) and simmer for 20-40 minutes until water begins to turn a bright peach color. Once the water starts to turn pink, turn off the heat and strain the plant material from the dye liquid.

-Place the wet fabric in the dye liquid and bring the dye bath back up to a simmer. Simmer for 15 to 20 minutes. For more saturated yellows, let the fiber steep overnight.

-When you have reached the desired hue, gently wash with a pH-neutral soap, rinse thoroughly, and hang to dry in the shade.


For more herbal hues and natural dye recipes, projects, and inspiration, check out these books written by Sasha. 

Duerr, Sasha. 2016. Natural color: Vibrant plant dye projects for your home and wardrobe.  Watson-Guptill. 

Duerr, Sasha. 2020. Natural Palettes: Inspiration from plant-based color. Princeton Architectural Press.


Photo credits: 1) Herbs used for dyeing; 2) Botanicals yield a variety of hues; 3) Aloe and other dye plants; 4) Aloe yields a yellow dye; 5) Pink and yellow dye from aloe. All photos courtesy of the author. 

Medicinal Disclaimer: It is the policy of The Herb Society of America, Inc. not to advise or recommend herbs for medicinal or health use. This information is intended for educational purposes only and should not be considered as a recommendation or an endorsement of any particular medical or health treatment. Please consult a health care provider before pursuing any herbal treatments.


Herbal Hacks, Part 2: Crafts, Health, and Beauty

From the calming characteristics of lavender to the practice of pressing plants, our readers find all sorts of ways to add a bit of herbiness to their crafty arts and relaxing rituals. Please enjoy our next installment of reader-submitted herbal hacks–herbs for crafts, health, and beauty.

four-assorted-color-petal-flowers_Columbine flowers via Pikrepo

I place a little crystal bowl of lavender buds on my bedside table. It helps me relax and get a good night’s sleep. – Janice Cox

Spray your pillow at night with lavender water for a relaxing sleep. – Kim Labash

If you are unfortunate enough to have an allergic reaction to poison ivy while working in your yard, did you know that jewelweed can help with the itchiness? It usually grows nearby. Just break off a stalk and rub the liquid onto the rash. – Janice Waite

DSC03233I love pressing herbs and flowers in a phone book or microwave press. I use the flowers for cards, bookmarks, etc. – Marilyn Roberts Rhinehalt

Before embroidering, wash your hands with lavender and lemon verbena soap–it keeps you calm and lends a lovely aroma to the work. – Kim Labash

Calming herbs such as calendula, parsley, and lavender make wonderful facial masks. Simply mix a tablespoon of natural clay with a teaspoon of fresh leaves or flowers, then add enough water to form a creamy mixture. – Janice Cox

Use a cloth on your lap when making lavender wands, and then gather the dropped heads and use for sachet making. – Kim Labash

On hot, humid days in the garden, when not a breath of air is stirring and the gnats insist on flinging themselves into your face, tuck several sprigs of southernwood (bruised to release the essential oils) into your headband or under your hat brim. It smells lovely and keeps the gnats at bay. – Kathleen McGowan

20201129_101632Buy a pair of rose bead earrings from the Potomac Unit of the Herb Society of America–the smell will waft around your head all day. ;) – Kim Labash

I love pressing herbs to make note cards. I print quotes on the front, package them with envelopes, and give as gifts! Everyone loves them! – Dianne Duperior

Light a “heady” smelling candle, such as gardenia, before you get into the bath for a soak–you won’t regret it. – Kim Labash

Photo Credits: 1) Columbines (Pikrepo); 2) Pressed flower luminaries (Erin Holden); 3) Lavender wand and rose bead earrings (Erin Holden)

My Adventures in Making Corn Husk Paper

By Angela Magnan

Corn husks for papermakingAfter watching a video online about making paper from corn husks, I thought it would be fun to try. I had never made paper before, but the video made it look easy. Don’t they always?! I first made some using the husks from six ears. After it didn’t really go well, I bought a book with more detail and tried again. 

But like many DIY projects that I try for the first time, or even the second, making paper out of corn husks reminded me that watching a video is no substitute for a detailed book, which in turn is no substitute for experience. It also reminded me that when trying something new, I should perhaps follow the directions. 

Corn husks and stalks are some of the many plant materials commonly found in home gardens that can be made into paper. Grass and leaf fibers are some of the easier materials to work with. Those who have more time on their hands venture into using bast fibers, the fibrous material in between the outer surface layer and the inner core of certain plants’ stems. Harvesting it involves peeling stems apart one by one and stripping out the bast fibers. Grass and leaf fibers only need to be picked and washed and sometimes cut into smaller pieces prior to processing. 

Corn husk pulpAll plant fibers need to be cooked for several hours in an alkali solution*, a mixture of water and soda ash, washing soda, wood ash lye, lime, or caustic soda (also called lye). Because the amount of alkali you add to the water is based on the dry weight of the plant material, you need to dry, weigh, and rehydrate your plant materials prior to adding to the pot. Cooking breaks down the fibers, and the alkali dissolves non-cellulose materials, like lignins and waxes, that can cause discoloration or prevent the fibers from freely separating. There are pros and cons to each type of alkali, but the trick to using any of them is that you need to balance out the strength of the alkali with the strength of the fibers. Too weak and you will be boiling your fiber for days; too strong and you will damage the fiber. 

Once the fibers pull apart easily, you can use a blender to turn them into pulp, or you can do it by hand using a flat surface and a bat, mallet, or meat tenderizer. 

Once the material is no longer stringy, you add it to a vat with some water and make the paper. This typically involves using a mould and deckle, which is a two-part frame with a screen that you dip into the vat. An alternative is to use a deckle box, which is a deep box on top of a screen that you pour the pulp into. Both of these serve to evenly distribute the pulp and keep it in the shape you want. 

Once the liquid has sufficiently drained back into the vat, a papermaker typically transfers the wet paper onto a wool felt or towel in a process called couching. Once much of the water is absorbed by the felt, the paper can then be pressed and dried.

On my first try, I cut the husks up into small pieces and then boiled them using washing soda as my alkali. Then, I used a blender to turn them into pulp. Everything was going as planned. But then? Because I was not sure if my first try would also be my last, I didn’t want to go through the trouble of mould and deckle, and boxbuying or making a mould and deckle and instead poured it through a screen. I ended up spreading it around with my fingers. When I tried to remove the paper from the screen, the pulp stuck to it and wouldn’t come off. Apparently, the screen needs to be wet before it comes into contact with the pulp, a detail I only learned later after I bought the book. And then instead of pressing it, I merely laid it out to dry. My result was lumpy paper with a lot of conkling, a term used by papermakers and watercolor artists for the wavy imperfections in dried paper.  

Because my brother had a field of corn he couldn’t sell this summer, I had plenty of free material to try again. So why not? I made a small mould and deckle from two round plastic containers, some foam, and a piece of an old window screen with the intention of making small paper circles that I could decorate with corn husk ribbons and string together like a garland. Then, after drying the husks from three dozen ears, which weighed about a pound, I rehydrated them in a five-gallon bucket. Because I have an endless supply of wood ashes from my woodstove, I decided to be overly ambitious and made my own wood ash lye, even though the book described it as unpredictable. The book also indicated that the amount of wood ash lye I made would be enough for one pound of dry fiber, but only half of my husks fit. I cooked that half in the wood ash lye for hours and hours, and they still didn’t break down sufficiently. When I tried to pulp it by hand, the fibers would not separate even after an hour of pounding. 

By putting the beaten fibers in a watery vat and swishing it around, also known as “hogging the vat,” I was able to get some good pulp to disperse into the water and pull out most of the bits that were still stringy. Even still, the tiniest remaining strings kept getting tangled in my homemade mould and deckle, so I became an expert at “kissing off,” the act of slapping your screen against the water surface to release the pulp so you can start over. In Finished Corn Husk Paperthe end, I removed the bottom from an old drawer, placed it over a window screen, and used that as a deckle box. Fortunately, I remembered to wet the screen first this time and was able to pour the good pulp through it, then couch, press, and dry it. I ended up with one 11 x 17 sheet of paper. To preserve my materials, I poured the rest of the stringy fibers through the screen and dried them as 2 sheets of lumpy “paper.” 

Despite my failures, I am determined to forge ahead. I may try cooking down my lumpy paper a bit more, and I still have half a pound of uncooked husks. And now, whenever I work in the garden, I can’t help but think, “Could I make paper from this plant? What about this one?”

Sources:

Hiebert, Helen. 1998. Papermaking with Plants. Pownal, VT: Storey Books.

“How to Make Paper from Corn.” Storm the Castle. www.stormthecastle.com/paper-making/how-to-make-paper-from-corn.htm

*Safety disclaimer: Alkali products can be dangerous. You should always wear gloves and goggles when handling any alkali, and you should have vinegar on hand to neutralize it in case of a spill or other accident. You also should not pour alkali solutions down the drain if you have a septic system.

Photo Credits: 1) Dried corn husks; 2) Partially beaten pulp; 3) Homemade mould and deckle and using a bottomless drawer as a deckle box; 4) The final product with the first try on the left and the second try on the right. All photos courtesy of the author.


Angela grew up on a dairy farm in Vermont and has degrees in biochemistry, horticulture, and science writing. She now lives in Maryland and has worked in the Gardens Unit at the US National Arboretum since 2012.

HSA Webinar: A Recipe for Success

By Bevin Cohen

I’ve long been amazed by the generous bounty offered to us by Mother Nature. Even as a young boy picking wintergreen berries in the woods, I just couldn’t believe that these tasty treats were available for me to enjoy, in quantities greater than I could ever consume, and the only cost was an afternoon in the shady forest, harvesting the luscious fruits as I listened to the melodious whistling of the birds and the occasional scurried sounds of a startled chipmunk or squirrel. 

As an adult, my appreciation for Nature’s endless gifts has only deepened, and I find IMG_1408myself preaching her message of abundance to anyone willing to listen. Through my work as an author, herbalist, and educator, I’ve been placed in a unique position to share my knowledge, experiences, and passion with audiences the world over, and the core of my message has always remained the same: Mother Nature provides for our every need. But we must first take the time to learn her language and then follow her advice.  

Just shy of a decade ago, my wife, Heather, and I founded Small House Farm, a sustainable homestead project in central Michigan. As a practicing herbalist, I felt that this venture was the perfect opportunity to continue promoting my ideology of Nature’s abundance and localized living. The salves, balms, tinctures, and teas that we offer are purposely crafted using only herbs grown in our gardens or harvested from the wild. Additionally, we have taken on the task of producing our own seed and nut oils through cold pressed, expeller extraction for all of our product lines. It’s through this direct relationship with our ingredients that we are able to create products that are not only potent and useful but that also reflect our value and commitment to localized sustainability. Just as the sommelier believes that the terroir of the grapes is reflected in the quality of the wine, at Small House we believe that our locally sourced ingredients are the recipe for success.

Please join me on Thursday, August 20th, at 1pm EDT for an Herb Society of America webinar entitled “Wildcrafted Herbs and Fresh Pressed Oils: How Locally Sourced ArtisanHerbalist_CatIngredients are a Recipe for Success.”  During this presentation, I’ll be discussing the value of locally sourced herbs from one’s own bioregion and the multitude of herbal allies available to us in our nearby parks, fields, and forests. I’ll also share my thoughts on do-it-yourself seed and nut oil production for use in herbal formulas, drawing on my years of experience with small-scale commercial production and sale of various oils including hempseed, sunflower, almond, flax, and pumpkin seed. 

Those joining us for the webinar will receive an exclusive coupon code for a 15% discount off the cover price of my 2019 bestselling book, Saving Our Seeds, as well as a unique link to preorder my upcoming book The Artisan Herbalist: Making Teas, Tinctures and Oils at Home (New Society ’21).

Webinars are free to Herb Society of America members and $5.00 for guests. Visit https://www.herbsociety.org/hsa-learn/hsa-webinars or click here to sign up. Become a member today, and enjoy all of our webinars for free, and as an added bonus, you’ll automatically be entered into a raffle for a free educational conference registration to our 2021 conference being held in Baton Rouge, LA, from April 29th – May 1st, 2021.

Photos courtesy of the author.


BevinCohenBevin Cohen is an author, herbalist, gardener, seed saver, educator, and owner of Small House Farm in Michigan. Cohen offers workshops and lectures across the country on the benefits of living closer to the land through seeds, herbs, and locally grown food, and he has published numerous works on these topics, including the bestselling Saving Our Seeds and his highly anticipated new book, The Artisan Herbalist (New Society ’21). He serves on the board of the International Herb Association and the advisory council for the Community Seed Network. Learn more about Cohen’s work on his website  www.smallhousefarm.com 

A Healing Herbal Gift

By: Gladys McKinneyIMG_7276

What with the coronavirus outbreak and so many people becoming ill with COVID-19, I wondered what I could do to help, besides staying home, of course. The images seen across social media and press reports are heartbreaking, to say the least.

I wanted to respond with herbs. My sister, my daughter, and my niece are all nurses, and I have a number of family members who are also in law enforcement. So, they have to put on and take off their safety equipment many times throughout the day during this phase of the crisis. The images of our first responders with broken skin, where the safety equipment rubs, seemed to need a response from somewhere, and petroleum jelly was not going to do it. So, I created the following recipe for a healing moisturizer.

The end result has a whipped butter texture that, IMG_7275admittedly, is somewhat greasy when put on due to the oils that are in it. But, keep in mind that these are the healing oils that the skin will need after a long day. After washing your face at night, simply put this moisturizer on. Wash it off in the morning, and then apply whatever moisturizer you would normally use. The healing moisturizer can be used on hands, elbows, and knees in the evening as well. This is not a regular everyday go-to moisturizer, but a way of moisturizing skin that has been through a rough day.

Healing Herbal Moisturizer

First, fill a small mason jar with dried roses* and add enough almond oil to completely cover them. Let this sit for about a week. This creates the rose-infused oil needed in the recipe.

IMG_72901 cup of shea butter

4 tablespoons of jojoba oil

2 tablespoons of rose-infused almond oil, strained from the roses.

2 teaspoons of honey

10 drops of vitamin E oil

10 drops of German (blue) chamomile essential oil

Chamomile is a favorite of mine. The flowers have a sweet apple scent that brings sunshine with each breath. Chamomile has been reputed to help with upset stomachs, colicky babies, insomnia, and soothing emotions. The reason for its application here is that chamomile has been noted to help with skin irritation, sores, and assist in wound healing.**

  1. Heat the shea butter and jojoba oil in a double boiler. Stir. Once melted, remove from heat and add the rest of the ingredients.
  2. Place in the refrigerator. Once this is solid and creamy white, take it out.
  3. Whip this until it looks like whipped cream.
  4. I put the whipped moisturizer in clear 5 gram screw top containers and needed just over 50 of them.IMG_7277

You can give these out to the first responders in your life, drop them by facilities that you think would need them, or if you are a first responder, you can make this for yourself.

Thank you to all the first responders for their loyalty and love for their fellow humans during this time.

*Do not use florists’ roses as they may have been treated with chemicals during processing.

**Never take essential oils internally.

Sources for ingredients:

Note: This recipe’s ingredients can be modified with ingredients of your choice. Just keep in mind not to allow anything with water to touch what you are doing, because it creates an environment for bacterial growth.

While The Herb Society of America does not endorse one establishment over another, we’ve provided some sources to help get you started. Please utilize due diligence in locating the material of your choosing.

Better Shea Butter

Mountain Rose Herbs  (an Herb Society of America business member)

Author’s Note: As of this writing, Mountain Rose Herbs will be temporarily closed until April 24th, 2020. Please read their statement here.

Starwest Botanicals

Medicinal Disclaimer: It is the policy of The Herb Society of America, Inc. not to advise or recommend herbs for medicinal or health use. This information is intended for educational purposes only and should not be considered as a recommendation or an endorsement of any particular medical or health treatment. Please consult a health care provider before pursuing any herbal treatments.


IMG_7308

Gladys and daughter Cheyenne, a nurse

Gladys McKinney is The Herb Society of America’s Treasurer and lives in Cape May, NJ. She has six children, loves accounting and herbs. When not busy with accounting, her favorite things to do with her children and one grandchild include gardening, going to the ocean, and reading old herbal books.

An Herbal Craft – Pressed Flower and Herb Note Cards

By Dianne Duperier, HSA Membership ChairDianne finished product

These pressed flower cards are a great idea for preserving the beauty of the flowers and herbs growing in your garden before Jack Frost has a chance to get to them. There is no limit to your imagination when creating these beautiful cards. Use the cards to remember birthdays or any other special occasion. Or—to sell at your next herb event. Or—to use as gifts. Be sure to make plenty! They will be in demand.

SUPPLIES NEEDED

  • Clean, dry, and pristine herbs, leaves, or flowers (woody and succulent stems do not press well)
  • Paper towels
  • 8.5”x11” 20/50# text stock or paper (for pressing)
  • 8.5”x11” 65# cover stock (for note cards)
  • Elmer’s glue
  • Thin brush
  • Scissors
  • Ruler
  • Fine-line ink pen
  • Herbal/garden quotes
  • Optional cut printed stock overlay (Scrapbook pages sold at Michaels or Hobby Lobby)
  • Plastic note card gift boxes or fabric bags (Available at Amazon or Uline)
  • #5.5 invitation envelopes (Available at Amazon)
  • Ribbon to trim finished product

PREPARING SPECIMEN

Dianne preparingdianne flowerpressDiane labeling

Select clean, dry, and perfect specimens of herbs, flowers, or leaves. If moist, pat specimens dry by pressing with a paper towel. A flower press can be used or you can use paper and books to press your specimens.

If using books to press your leaves and flowers, fold an 8.5”x11” sheet of text stock paper in half and lay the specimens on the paper. Try not to overlap. Put inside another folded 8.5”x11” cover stock sheet to protect the pages of the books used for pressing. Continue until all of the specimens are done. Press for several weeks or months until ready to assemble.

Unless you know the names of all your herbs, flowers, and greenery, I suggest labeling them before pressing.

PREPARING NOTE CARDS

Dianne coverstockDianne overlay

Cut an 8.5”x11” cover stock sheet into fourths.  Trim if needed. This is the best use of a sheet of 8.5”x11” cover stock. The envelopes and plastic boxes suggested in supplies are based on this size. If making a different size card you would need to order envelopes and boxes/bags to fit that size.

If using a printed overlay, cut a piece of overlay to the desired size and glue to the front of the card using a thin layer of glue. (Some people water down the glue.) Let it dry. Press if needed.

ARRANGING SPECIMENS ON CARDS AND GLUING

Dianne arranging dried productDianne herbs on card

On a large table, lay out your specimens with proper identification.  Assemble 3-5 specimens per card. With a thin brush, lightly apply glue to the back of each specimen and arrange on the card. You may need to blot to remove any excess glue. Let air dry and then weigh down and allow to dry overnight.

FINISHING NOTE CARDS

Dianne inside cardDianne Herbs-With Overlay1 (1)Dianne herbs on card 1

Using a ruler, sign your card, and add the year. Using a ruler, write a message on the top or side of the card. Insert a quote, if desired. (Herb, garden, and seasonal quotes can be found online.) Select five assorted cards and five envelopes for packaging.

PACKAGING NOTE CARDS

Dianne finishedDianne packaging

Insert in plastic note card gift boxes or recycled boxes and secure with ribbon. Another option is to package your cards in fabric drawstring bags.